1U Fan Rack Cooler V3
Description
PDFUpdate (2.10.2023):
V3:
Fixes the width issue, brings in threaded insert for easy mounting, and in some places thicker walls. (V2 is not compatible with V3)
Update (20.4.23):
V2 :
Upload, a new 120mm Fan Duct and Rack Cover, Fan Duct Guided, new Fastening Method, and a new Bridge to install a Switch and DC Plug
V2 consists of a completely new design, with a stronger body, less filament use while printing, and a new Bridge, which allows you to connect a Switch and a direct Power Input, without some funny DIY wiring.
Overall Design
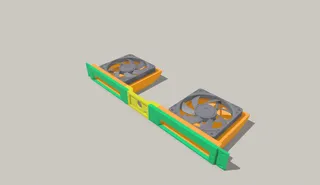
You can either connect two 120mm Fan Ducts or one Fan Duct to any side you prefer. While only using one, keep in mind, that the whole structure holds better by printing the whole Blank. The Bridge in the middle connects the two pieces.
V3: V3 uses between 4 or 6 threaded M3x5.7mm Inserts. I only inserted 4 out of those 6 holes, and seems to be enough. The threaded hole is around 8mm deep, screws with a longer length than 10mm are not recommended. As well have the Fan Ducts been updated to use the same 3Mx5.7mm Threaded Inserts to secure the Ducts to the Wings
In total you'll need:
- 12-14x M3x5.7mm Threaded Inserts
- 12-14x M3x8-10mm Screws
(V2 Use Nuts and M3 Screws to connect Bridge with Wing. The Fan Ducts need M2.5, Plastite, or Self-tapping Screws)
General Notice:
Version 1/2/3 are NOT compatible with one other. Choose between one Version. (I recommend V3)
- Wings
The Wings have two features, let air through or no air through. Whatever you need, you don't need to mirror them in your Slicer, to have installed on the opposite side.
- Wing Bridge + Wing Bridge Connector
You can choose between two types of Bridges. One for a Switch and a Front DC Jack Input to power the System or the Blank Version, which I don't recommend.
For the Bridge Connector, you can buy these parts from AliExpress to make accessibility easier:
Switch: (https://de.aliexpress.com/item/4000899454626.html?spm=a2g0o.order_list.order_list_main.585.6c355c5f15b1pc&gatewayAdapt=glo2deu)
DC Power Jack: (https://de.aliexpress.com/item/4000585704812.html?spm=a2g0o.order_list.order_list_main.424.6c355c5f15b1pc&gatewayAdapt=glo2deu)
- Fan Duct + Fan Duct Guided
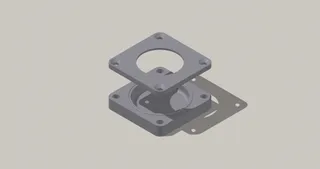
These Fan Ducts distribute the air, the non-guided more directional and the guided a little more widespread. Choose the Fan Duct which works best with your system.
Let me know if you have issues with this Design, I'll gladly hop back into my CAD.
----------------------------------------------------------------------------------------------------------------
So, I have this little and tight Home Network Rack which cannot hold a lot of components and to maximize the performance and to cool my components (which always freeze when overheated) I‘ve designed this 1U Rack Cooling Unit.
The three long legs which form the exact measurement for the length and height of any 19“ Rack, are the mounting base for the airflow guide where you mount the fans.
The reason they are not the same size is because I had these lying around from the junkyard, they still worked and I didn‘t want to buy any new ones.
The first one is 80mm and the second one is 92mm.
Some things to keep an eye out for:
- After printing, I drilled the holes for mounting the fans
- Fastening them and putting them in place is painful, but it works… you have been warned
- For slowing one fan down, I used some resistors which can withstand the hold
- Those three legs need mounting screws to hold them together
- The Holes for mounting to the Rack are a little deep, and they are a small pain compared to the rest to mount.
- Used a simple 12V Power supply to power those two Fans
- To keep dust out of my shelf, I turned the whole print 180 degrees so that it took air from below
This Project has a lot to improve like preset Air Guides, other mounting holes, predrilled holes, other Rack Mounting designs, 120mm Fan Air Guides, etc.
Hit me up if you are interested in redesigning it (CAD Files) or improving it.
Designing to be printed on general FDM Printers
The Design has a simple need, to cool a 1U shelf. In the production, it needed to fit on my small print bed to cool the air as a temporary solution. But it works just fine so I will let it be installed.
Tags
Model origin
The author marked this model as their own original creation. Imported from Thingiverse.


