Curvy Lamp Shade with Stem Assembly
Description
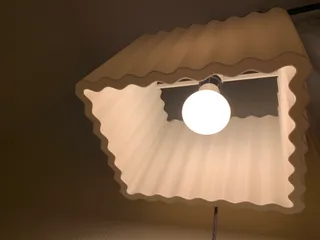
PDFA Curvy Lamp Shade with a Three-Piece Stem Assembly. This 3D-Printed Lamp assembly combines off-the-shelf components with artistic 3D-printed parts to make a beautiful, modular Lamp Assembly.
The 3D printed parts [~24.65 hrs, ~430g PLA]:
- Curvy Lamp Shade
- Base [MK3S Size or Mini Size]
- Stem
- Bulb Holder
Alternative Lamp Shade Designs:
- Sine Wave Lamp Shade [MK3S version] https://www.prusaprinters.org/prints/41599-sine-wave-lamp-shade-mk3s-version
- Sine Wave Lamp Shade [Mini Version] https://www.prusaprinters.org/prints/41600-sine-wave-lamp-shade-mini-version
The Off the Shelf Components:
- Bulb Socket E26/ E27 with screw terminals
- Lamp Cord with on/off switch and stripped ends (hooks up to bulb socket)
- Your own lightbulb (I used Phillips Hue A19)
- White Prusament PLA Recommended for the shade
- Galaxy Black Prusament PLA shown for the stem assembly
Print instructions
General Recommendations:
A. Make sure the extruder head cable bundle won't impact your prints. The lamp shade fills up most of the print volume on the MK3S. Watch your extruder head cable when the print is near the maximum Z-height --> make sure the cable bundle is not going to collide with your print and thus remove it from the bed like it did for me initially before I realized I needed to straighten that cable bundle.
B. For MK2.5S printing, the effective build area is about ~5mm less in the X-direction. You may need to offset the print 5mm to the right to make sure brim or skirts are not collapsing with your print.
C. Print settings are 0.3mm for the lamp and 0.2mm for the stem assembly. I recommend using these and sticking with the .3mf settings as much as possible, except to change your printer or adjust a filament. The .3mf is only validated for White Prusament PLA on the shade and Galaxy Black Prusament PLA for the stem assembly. Other filaments could require slightly different settings.
Detailed Print and Assembly Instructions:
- Acquire the off the shelf components needed for the lamp assembly.
- Measure your components, and measure the 3D prints per the STEP files provided here. Make sure your components would fit. If not, adjust the STEP file accordingly, and output new STL as needed.
- Print the Curvy Lamp Shade model <lampshadecurvy.3mf>
- Print the Lamp Stem Assembly model <lampshadecurvy.3mf>
- Route the electrical plug with stripped ends through the base, stem, then the bulb holder 3D prints.
- Assembly the base, stem and bulb holder with light pressure - a press fit should be all it takes to secure. Glue can be added if your tolerances are loose.
- Take two of your off the shelf components: wire the stripped ends of the electrical plug to the bulb socket ensuring positive and ground are correct. Double check this step before plugging into a wall!
- Set the bulb socket in the bulb holder 3D print.
- Insert a light bulb into the bulb socket.
- Assemble the lamp shade by sliding it onto the bulb socket off the shelf component.
- Insert/ screw in a light bulb from the top
- Test to make sure it turns on.
- [Optional] if the base is slippery on the surface it is on, add rubber stick on pads or similar.
Tags
Model origin
The author hasn't provided the model origin yet.


